We have a new documentation site. Please go here to see the latest.
API - read/write checklist via Jira REST
- Jack (Hunter) Jaroczynski
- Maciej Opala (Deactivated)
- Piotr Stefaniak (Deactivated)
- Jacek Jaroczynski (Unlicensed)
On this page
Introduction
You can use Jira REST API to interact with the Issue Checklist programmatically. This page documents the REST resources available to use, including example requests and responses. Use this API to build script interactions with your checklist, or develop any other type of integration.
This guide applies to Jira REST API version 2 calls only. While the latest Jira REST API version is 3, it is still in beta and doesn't work with the Issue Checklist.
This guide applies to Jira Classic projects only. Jira Next-Gen projects don't support global custom fields, which is required for checklist REST API access.
You can access checklist data stored in custom fields even if the Issue Checklist plugin has been uninstalled.
Prerequisites
- "Save checklist data to Jira custom fields" option must be enabled in Global Settings.
- For updating or removing existing checklist Checklist Text custom field must be present on the Edit issue screen. You can configure that in your Jira project settings with these instructions: how to add a custom field to a screen.
For only reading the checklist, there is no such requirement.
Please note that through API you can also read checklist metadata stored in issue entity properties, like the number of items or completeness status.
Authentication
Following guide is based on basic-authentication which means that all calls will impersonate you during the call. Your user needs to have relevant permissions granted ("read issue", "edit issue") in your Jira to manipulate the issue checklist custom field. Also, a valid api_token for your Atlassian ID account is required (see instructions how to generate the token).
Note: in the cURL examples below you will need to replace:
| What | Replace with | Example |
|---|---|---|
| an email address provided in your Atlassian ID account | stefan@herocoders.com | |
<api_token> | a valid API token for your Atlassian ID | J3D4smrVz29cxzsd |
https://your-domain.atlassian.net | the URL of your Jira Cloud instance | https://stefan-dev.atlassian.net |
| an issue key that you want to interact with | DEMO-1 |
Available resources (Text format examples)
Get issue checklist
GET /rest/api/2/issue/{issueIdOrKey} (reference)
Returns the details of an issue, including its checklist.
cURL example:
curl --request GET \
  --url 'https://your-domain.atlassian.net/rest/api/2/issue/{issueIdOrKey}' \
  --user 'email@example.com:<api_token>' \
  --header 'Accept: application/json'
Example response (application/json):
{
  "expand": "",
  "id": "10002",
  "self": "https://your-domain.atlassian.net/rest/api/2/issue/10002",
  "key": "DEMO-1",
  "fields": {
  (...) // omitted for brevity
    "customfield_10034": "--- Tested on\n* Chrome\n* Safari\n* Firefox\n* Edge\n* [x] IE11",
  }
  (...) // omitted for brevity
}
![]() Note the "customfield_10034" string can be different than in the example above. It should be the ID of "Checklist Text" custom field found in your Jira instance (see instructions how to find custom field ID).
Note the "customfield_10034" string can be different than in the example above. It should be the ID of "Checklist Text" custom field found in your Jira instance (see instructions how to find custom field ID).
The response format of the checklist is documented in separate page: Issue Checklist Text format.
Create or update issue checklist
PUT /rest/api/2/issue/{issueIdOrKey} (reference)
Updates the issue including its checklist.
cURL example:
curl --request PUT \
  --url 'https://your-domain.atlassian.net/rest/api/2/issue/{issueIdOrKey}' \
  --user 'email@example.com:<api_token>' \
  --header 'Accept: application/json' \
  --header 'Content-Type: application/json' \
  --data '{
    "fields": {
      "customfield_10034": "--- Tested on\n* [x] Chrome\n* Safari\n* Firefox\n* Edge\n* [x] IE11\n--- Mobile\n* Android\n* iPhone"
    }
  }'
![]() Note the "customfield_10034" string can be different than in the example above. It should be the ID of "Checklist Text" custom field found in your Jira instance (see instructions how to find custom field ID).
Note the "customfield_10034" string can be different than in the example above. It should be the ID of "Checklist Text" custom field found in your Jira instance (see instructions how to find custom field ID).
The request format of the checklist is documented in separate page: Issue Checklist Text format.
Response errors:
{"errorMessages":[],"errors":{"customfield_10034":"Field 'customfield_10034' cannot be set. It is not on the appropriate screen, or unknown."}}
The Checklist Text custom field must be present on the Edit issue screen. You can configure that in your Jira project settings with these instructions: how to add a custom field to a screen.
Remove issue checklist
Same as "Create or update issue checklist" above, but you need to pass null or empty value for the custom field:
cURL example:
curl --request PUT \
  --url 'https://your-domain.atlassian.net/rest/api/2/issue/{issueIdOrKey}' \
  --user 'email@example.com:<api_token>' \
  --header 'Accept: application/json' \
  --header 'Content-Type: application/json' \
  --data '{
    "fields": {
      "customfield_10034": null
    }
  }'
Examples
General read-modify-update scenario
One of the common scenarios is to programmatically retrieve checklist from the Jira issue, modify its items (depending on some business logic), and pass the checklist back to Jira issue with the items updated. We won't provide a working solution in your favorite technology, but the general gist is:
- download current representation of the issue via GET /rest/api/2/issue/{issueIdOrKey}
- knowing Checklist Text field id, extract and parse checklist value:
representation→fields→customfield_xxxxx(parse items by new line characters) - modify parsed checklist according to your needs, for example to check item put "x" in its square brackets (so that "* [] summary" becomes "* [x] summary")
- upload modified value back to the issue via PUT /rest/api/2/issue/{issueIdOrKey}
Add checklist to the issue (cURL)
- Open terminal.
Save the exact content of the below snippet to a local file, e.g. example.json:
Text{"fields": {"customfield_12345": "[x] example item"}}Replace customfield_12345 string with the ID of "Checklist Text" custom field in your Jira instance (see instructions how to find custom field ID).
Type following command in the terminal:
curl -D- -u "jack@herocoders.com:api_token" --request PUT --header "Content-Type: application/json" --url 'https://jiraUrl.atlassian.net/rest/api/2/issue/DEMO-1' --data-binary @example.json
Replace jack@herocoders.com with an email address provided in your Atlassian ID account.
Replace api_token with a valid token generated in Atlassian ID account (see instructions how to generate token).
Replace jiraUrl with URL of your Jira.
Replace DEMO-1 with an issue key that you want to update.- Go to Jira issue page (in our case https://jiraUrl.atlassian.net/browse/DEMO-1) and see that:
- Checklist has been updated automatically and it contains single checked item "example item".
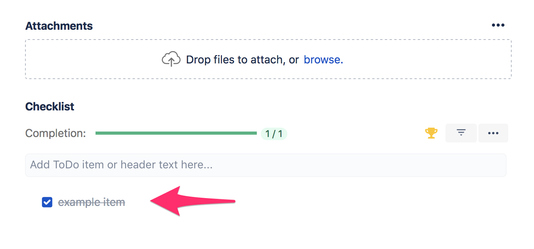
- "Checklist Text" field has been updated with the checklist provided in example.json file. You can see it only if Checklist Text field is visible on the View Issue Screen:
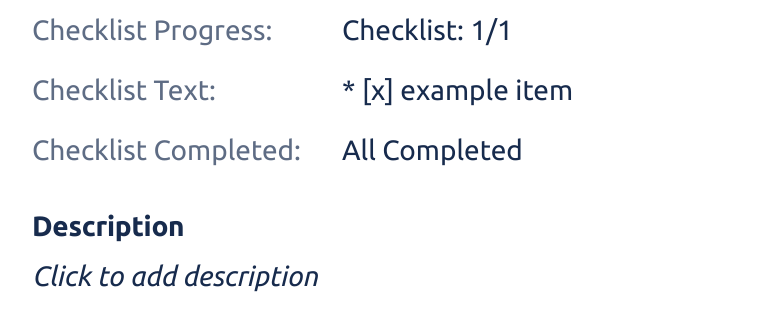
You can also see that the other checklist custom fields (Checklist Progress and Checklist Completed) has been updated accordingly.
- Checklist has been updated automatically and it contains single checked item "example item".