On this page
| Table of Contents | ||||
|---|---|---|---|---|
|
Introduction
...
On this page
| Table of Contents | ||||
|---|---|---|---|---|
|
Introduction
You can use Jira REST API to interact with the Issue Checklist programmatically. This page documents the REST resources available to use, including example requests and responses. Use this API to build script interactions with your checklist, or develop any other type of integration.
...
- "Save checklist data to Jira custom fields" option must be enabled in Global Settings.
- For updating or removing existing checklist a custom field Checklist Content YAML or Checklist Text custom field (depending on the format you want to use) must be present on the Edit issue screen. You can configure that in your Jira project settings with these instructions: how to add a custom field to a screen.
For only reading the checklist, there is no such requirement.
...
Available resources (Text format examples)
Get issue checklist
GET /rest/api/2/issue/{issueIdOrKey} (reference)
Returns the details of an issue, including its checklist.
...
Create or update issue checklist
PUT /rest/api/2/issue/{issueIdOrKey} (reference)
Updates the issue including its checklist.
cURL example:
| Code Block |
|---|
curl --request PUT \
  --url 'https://your-domain.atlassian.net/rest/api/2/issue/{issueIdOrKey}' \
  --user 'email@example.com:<api_token>' \
  --header 'Accept: application/json' \
  --header 'Content-Type: application/json' \
  --data '{
    "fields": {
      "customfield_10034": "--- Tested on\n* [x] Chrome\n* Safari\n* Firefox\n* Edge\n* [x] IE11\n--- Mobile\n* Android\n* iPhone"
    }
}' |
![]() Note the "customfield_10034" string can be different than in the example above. It should be the ID of "Checklist Text" custom field found in your Jira instance (see instructions how to find custom field ID).
Note the "customfield_10034" string can be different than in the example above. It should be the ID of "Checklist Text" custom field found in your Jira instance (see instructions how to find custom field ID).
The request format of the checklist is documented in separate page: Issue Checklist Text format.
Response errors:
| Code Block |
|---|
{"errorMessages":[],"errors":{"customfield_10034":"Field 'customfield_10034' cannot be set. It is not on the appropriate screen, or unknown."}} |
The Checklist Text custom field must be present on the Edit issue screen. You can configure that in your Jira project settings with these instructions: how to add a custom field to a screen.
Remove issue checklist
Same as "Create or update issue checklist" above, but you need to pass null or empty value for the custom field:
cURL example:
| Code Block |
|---|
curl --request PUT \
  --url 'https://your-domain.atlassian.net/rest/api/2/issue/{issueIdOrKey}' \
  --user 'email@example.com:<api_token>' \
  --header 'Accept: application/json' \
  --header 'Content-Type: application/json' \
  --data '{
    "fields": {
      "customfield_10034": null
    }
}' |
Available resources (YAML format examples)
Get issue checklist
GET /rest/api/2/issue/{issueIdOrKey} (reference)
Returns the details of an issue, including its checklist.
cURL example:
| Code Block |
|---|
curl --request GET \
  --url 'https://your-domain.atlassian.net/rest/api/2/issue/{issueIdOrKey}' \
  --user 'email@example.com:<api_token>' \
--header 'Accept: application/json' |
Example response (application/json):
| Code Block |
|---|
{
  "expand": "",
  "id": "10002",
  "self": "https://your-domain.atlassian.net/rest/api/2/issue/10002",
  "key": "DEMO-1",
  "fields": {
  (...) // omitted for brevity
    "customfield_10033": "items:\n  - text: '---Tested on'\n    checked: false\n  - text: Chrome\n    checked: true\n  - text: Safari\n    checked: false\n  - text: Firefox\n    checked: false\n  - text: Edge\n    checked: false\n  - text: IE11\n    checked: false\n",
  }
  (...) // omitted for brevity
} |
![]() Note the "customfield_10033" string can be different than in the example above. It should be the ID of "Checklist Text" custom field found in your Jira instance (see instructions how to find custom field ID).
Note the "customfield_10033" string can be different than in the example above. It should be the ID of "Checklist Text" custom field found in your Jira instance (see instructions how to find custom field ID).
The response format of the checklist is documented in separate page: Checklist Content YAML.
Create or update issue checklist
PUT /rest/api/2/issue/{issueIdOrKey} (reference)
Updates the issue including its checklist.
cURL example:
| Code Block |
|---|
curl --request PUT \
  --url 'https://your-domain.atlassian.net/rest/api/2/issue/{issueIdOrKey}' \
  --user 'email@example.com:<api_token>' \
  --header 'Accept: application/json' \
  --header 'Content-Type: application/json' \
  --data '{
    "fields": {
      "customfield_10033": "items:\n  - text: ---Tested on\n    checked: false\n  - text: Chrome\n    checked: true\n  - text: Safari\n    checked: false\n  - text: Firefox\n    checked: false\n  - text: Edge\n    checked: false\n  - text: IE11\n    checked: true\n  - text: ---Mobile\n    checked: false\n  - text: Android\n    checked: false\n  - text: iPhone\n    checked: false\n"
    }
}' |
![]() Note the "customfield_10033" string can be different than in the example above. It should be the ID of "Checklist Text" custom field found in your Jira instance (see instructions how to find custom field ID).
Note the "customfield_10033" string can be different than in the example above. It should be the ID of "Checklist Text" custom field found in your Jira instance (see instructions how to find custom field ID).
The request format of the checklist is documented in separate page: Checklist Content YAML.
Response errors:
| Code Block |
|---|
{"errorMessages":[],"errors":{"customfield_10033":"Field 'customfield_10033' cannot be set. It is not on the appropriate screen, or unknown."}} |
The Checklist Content YAML custom field must be present on the Edit issue screen. You can configure that in your Jira project settings with these instructions: how to add a custom field to a screen.
Remove issue checklist
Same as "Create or update issue checklist" above, but you need to pass null or empty value for the custom field:
cURL example:
| Code Block |
|---|
curl --request PUT \
  --url 'https://your-domain.atlassian.net/rest/api/2/issue/{issueIdOrKey}' \
  --user 'email@example.com:<api_token>' \
  --header 'Accept: application/json' \
  --header 'Content-Type: application/json' \
  --data '{
    "fields": {
      "customfield_10033": null
    }
}' |
Examples
General read-modify-update scenario
One of the common scenarios is to programmatically retrieve checklist from the Jira issue, modify its items (depending on some business logic), and pass the checklist back to Jira issue with the items updated. We won't provide a working solution in your favorite technology, but the general gist is:
...
- for Checklist Content YAML field use YAML processing library of your choice
- for Checklist Text parse items by new line characters
...
- set items
checkedproperty totrue(Checklist Content YAML) - add preceding
'[x] 'to each item (Checklist Text)
...
cURL example:
| Code Block |
|---|
curl --request PUT \
  --url 'https://your-domain.atlassian.net/rest/api/2/issue/{issueIdOrKey}' \
  --user 'email@example.com:<api_token>' \
  --header 'Accept: application/json' \
  --header 'Content-Type: application/json' \
  --data '{
    "fields": {
      "customfield_10034": "--- Tested on\n* [x] Chrome\n* Safari\n* Firefox\n* Edge\n* [x] IE11\n--- Mobile\n* Android\n* iPhone"
    }
}' |
![]() Note the "customfield_10034" string can be different than in the example above. It should be the ID of "Checklist Text" custom field found in your Jira instance (see instructions how to find custom field ID).
Note the "customfield_10034" string can be different than in the example above. It should be the ID of "Checklist Text" custom field found in your Jira instance (see instructions how to find custom field ID).
The request format of the checklist is documented in separate page: Issue Checklist Text format.
Response errors:
| Code Block |
|---|
{"errorMessages":[],"errors":{"customfield_10034":"Field 'customfield_10034' cannot be set. It is not on the appropriate screen, or unknown."}} |
The Checklist Text custom field must be present on the Edit issue screen. You can configure that in your Jira project settings with these instructions: how to add a custom field to a screen.
...
Remove issue checklist
Same as "Create or update issue checklist" above, but you need to pass null or empty value for the custom field:
cURL example:
| Code Block |
|---|
curl --request PUT \
  --url 'https://your-domain.atlassian.net/rest/api/2/issue/{issueIdOrKey}' \
  --user 'email@example.com:<api_token>' \
  --header 'Accept: application/json' \
  --header 'Content-Type: application/json' \
  --data '{
    "fields": {
      "customfield_10034": null
    }
}' |
Examples
General read-modify-update scenario
One of the common scenarios is to programmatically retrieve checklist from the Jira issue, modify its items (depending on some business logic), and pass the checklist back to Jira issue with the items updated. We won't provide a working solution in your favorite technology, but the general gist is:
- download current representation of the issue via GET /rest/api/2/issue/{issueIdOrKey}
Add checklist to the issue (cURL)
...
Save the exact content of the below snippet to a local file, e.g. example.json (choose one of the snippets: YAML or Text):
| Code Block | ||
|---|---|---|
| ||
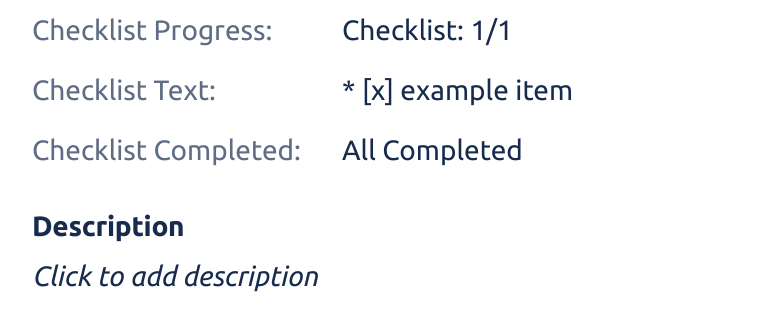
{"fields": {"customfield_12345": "items:\n - text: example item\n checked: true\n"}} |
...
- knowing Checklist Text field id, extract and parse checklist value:
representation→fields→customfield_xxxxx(parse items by new line characters) - modify parsed checklist according to your needs, for example to check item put "x" in its square brackets (so that "* [] summary" becomes "* [x] summary")
- upload modified value back to the issue via PUT /rest/api/2/issue/{issueIdOrKey}
Add checklist to the issue (cURL)
| Expand | |||||||
|---|---|---|---|---|---|---|---|
|

Check all checklist items for a given issue (Node.js)
| Expand | ||||||||||
|---|---|---|---|---|---|---|---|---|---|---|
|
Check all checklist items for a given issue (Node.js)
| Expand | |||||||||||||
|---|---|---|---|---|---|---|---|---|---|---|---|---|---|
|
