We have a new documentation site. Please go here to see the latest.
Import issues from CSV containing checklist items
This page describes how to import a checklist together with the issues imported to Jira from CSV file.
This guide applies to Jira Classic projects only.
The checklist should be placed in a Checklist Text custom field in the CSV file along with other issue's data like Summary and Description.
Prerequisites
"Save checklist data to Jira custom fields" option must be enabled in Global Settings.
Prepare the CSV file
Please follow Jira's documentation on how to prepare a CSV file.
Please tag imported issues in any way, e.g., add a label "csv-import" (so you can search/list the issues after the import).
- The custom field name is to be put in the header of the CSV file (just like other field names, e.g. Summary)
- Checklist data is to be put in the CSV file as a single entry/cell for each issue (so checklist items are not split into separate entries or columns).
The CSV file should contain a checklist in the Text format.
Hint
Copy text from Editor to get Text format.
Import the CSV file to Jira
You can import the CSV file in Jira in a few ways. We recommend using the "Import issue" button from the "Create issue" dialog as presented in the screenshot below:
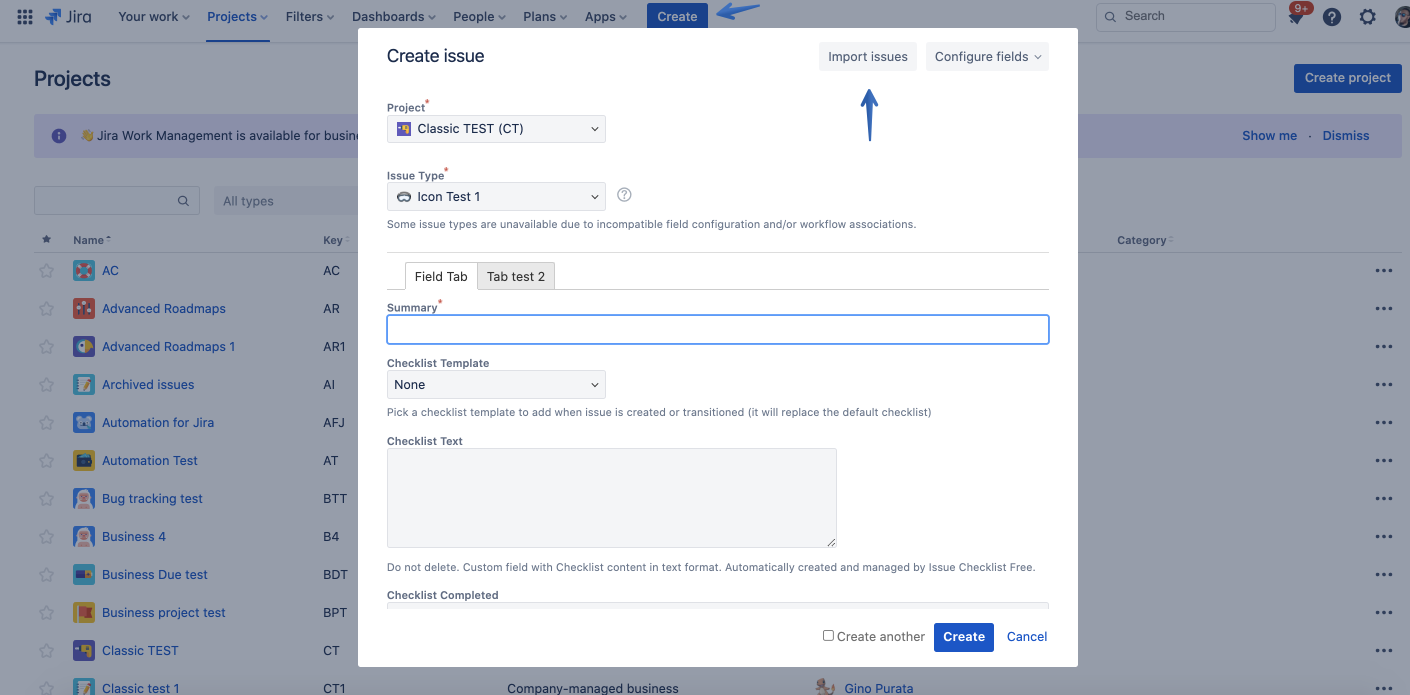
That way Issue Checklist imports checklist data automatically (Jira sends "issue updated" webhook/notification to Issue Checklist) and all is set.
Please leave "Map field value" option unchecked for "Checklist Text" field to make sure the field values are not changed but imported exactly as stored in CSV file.
However, you can also import CSV from the "System > External system import" feature as explained in Jira's documentation. This way Jira does not send "issue updated" webhook/notification, and an additional step is required to let the Issue Checklist know about imported issues. See this ticket for more details. In that case, please proceed to the section below and read how to import a checklist from plain/raw data stored in a custom field.
Import the checklist
If you used the "Import issue" button from the "Create issue" dialog, then all checklist data should be already available. No further steps are required.
If you used the "System > External system import" feature, please follow the guide below to transfer checklist data from the custom field to the checklist UI.
This step imports checklist stored in a Checklist Text custom field to the DB, so checklists become visible in Jira UI.
Migrating data from other/source Jira with External System Import feature creates Checklist Text field which is not linked with Issue Checklist installation on the current/destination Jira. In this case, you end up with two/duplicated Checklist Text fields.
Migrating data from other/source Jira with CSV Import feature appends data to the existing Checklist Text custom field which is linked with Issue Checklist installation on the current/destination Jira. In this case, you end up with a single Checklist Text field.
Prerequisite:
- Install Issue Checklist if it is not installed
- Enable the "Save checklist data to Jira custom fields" option in Global Setting.
Two (duplicated) Checklist Text fields
Please note the ID of the source Checklist Text field (created by the External System Import) containing the checklist in plain/raw text format
New/current installation of Issue Checklist will create new Checklist Text field (you will have duplicate fields with those names: one imported from the old Jira instance, the other created by new Issue Checklist installation on the current Jira).
Please note the ID of the new custom field named “Checklist Text”Copy content of the source custom field to the destination one for all issues (or just all issues with the non-empty old custom field).
You can find all issues containing checklist data in old custom fields using simple JQL, e.g.:cf[10159] is not empty(the number in square brackets is the ID of old/imported “Checklist Text” custom field)The copy can be performed in several ways, e.g.:
through CSV import/export or
using Script Runner or
Jira built-in automation.
- Check your issues and confirm that they contain checklist items and checkboxes.
If the issues don't contain the checklist items, please read below
Single Checklist Text fields
- Please note the ID of the Checklist Text field containing the checklist in plain/raw text format (after proper CSV import).
If the Checklist Text custom field has proper content (is not empty) but the checklist is not visible as clickable checkboxes, it means that you used the CSV import feature which does not notify apps (including Issue Checklist) about issue updates.
In that case, you need to force an update of the Checklist Text custom field (e.g. by appending a space character at the end or header at the beginning of each affected issue).
There are several ways of doing it. An example:create an Automation rule that:
(the trigger) listens for issue update
(condition) continues if the label “imported” is applied
(action) updates Checklist Text field by appending a space character - see step 5 in the following guide on how to “append” value: Append checklist items on issue transition
bulk update imported Jira issues (in Jira Search list) and apply “imported” label - it will trigger the Automation rule defined above
- Check your issues and confirm that they contain checklist items and checkboxes.
If the issues don't contain the checklist items, please double check if the Automation rule (or any other process of updating Checklist Text field that you used) was executed correctly and the Checklist Text custom field was updated.
Troubleshooting
If you cannot find a checklist after performing the steps described above then:
- Please open an issue and check if the custom field contains checklist Text.
You might need to add the custom field to a screen to see its value.
If the checklist is not in the custom field, then it means that the import process was not able to read it from the CSV file. In that case please fix the CSV file, so it contains a checklist, and then repeat the import process