...
- "Save checklist data to Jira custom fields" toggle must be enabled in Global Settings.
- Checklist Text or Checklist Content YAML the custom field must be present on the Edit Issue screen on Jira. Read how to add a custom field to a screen.
...
- Create a checklist and copy its YAML or Text representation in the following way:
- Please go to any issue in JIRA and apply a checklist template with Load template menu action (unless the issue already contains the checklist that we want to use).
Copy Text to the clipboard or copy checklist as YAML to the clipboard
The copied Text content might look similar to this:Code Block [x] Item #1 [] Item #2 [] Item #3 can contain **bold** and other markdown elements
The copied YAML content might look similar to this:
code
items:
  - text: 'Item #1'
    checked: true
  - text: 'Item #2'
    checked: false
  - text: 'Item #3' can contain **bold** and other markdown elements
    checked: false
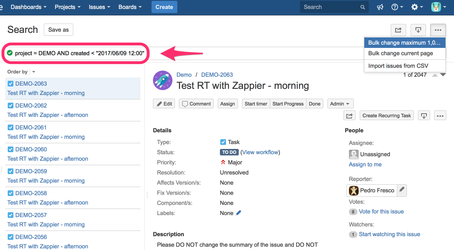
Next, go to Jira Issue Search view and find all the issues that you want to apply the checklist to.
In our example, we want to find all issues created before 12 pm, June 9, 2017so our JQL advanced search statement will look like this:Code Block created < "2017/06/09 12:00"
Note: you might modify the search according to your needs, e.g. narrow the search result to issues from one project only.
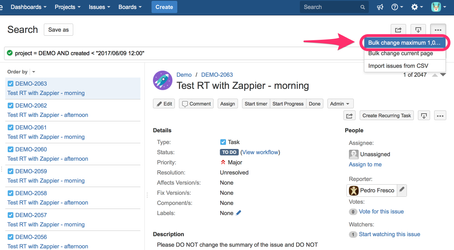
- Bulk edit the issues
- Select Bulk Change option from the three dots menu "..." of the Issue Search view (available in the top right corner of the Search page).
- In the Step 1 of 4 select all the issues.
- In the Step 2 of 4 select Edit Issues option
- In the Step 3 of 4 find Checklist Text or Checklist Content YAML field field
- mark the checkbox to indicate that you want to change the value of that field
- paste content of the clipboard into the field (value copied in point 1b of this guide)
- optionally, you can uncheck Send email for this change option at the bottom of the screen (so no one gets an email about the change)
- In the Step 4 of 4 review the changes and click Confirm button.
- Select Bulk Change option from the three dots menu "..." of the Issue Search view (available in the top right corner of the Search page).
...
| Info |
|---|
Please note, that the same result can be achieved programmatically - it is possible to change the value of the Checklist Text or Checklist Content YAML fields field through JIRA REST API. Read more. |
...